
Properly adjusting manual slack adjusters is a critical maintenance task that ensures heavy truck braking systems operate at peak efficiency and comply with safety regulations. This guide provides a step-by-step technical walkthrough for fleet mechanics and owner-operators to maintain optimal brake stroke and vehicle safety.
Understanding the Role of Manual Slack Adjusters in Braking Systems
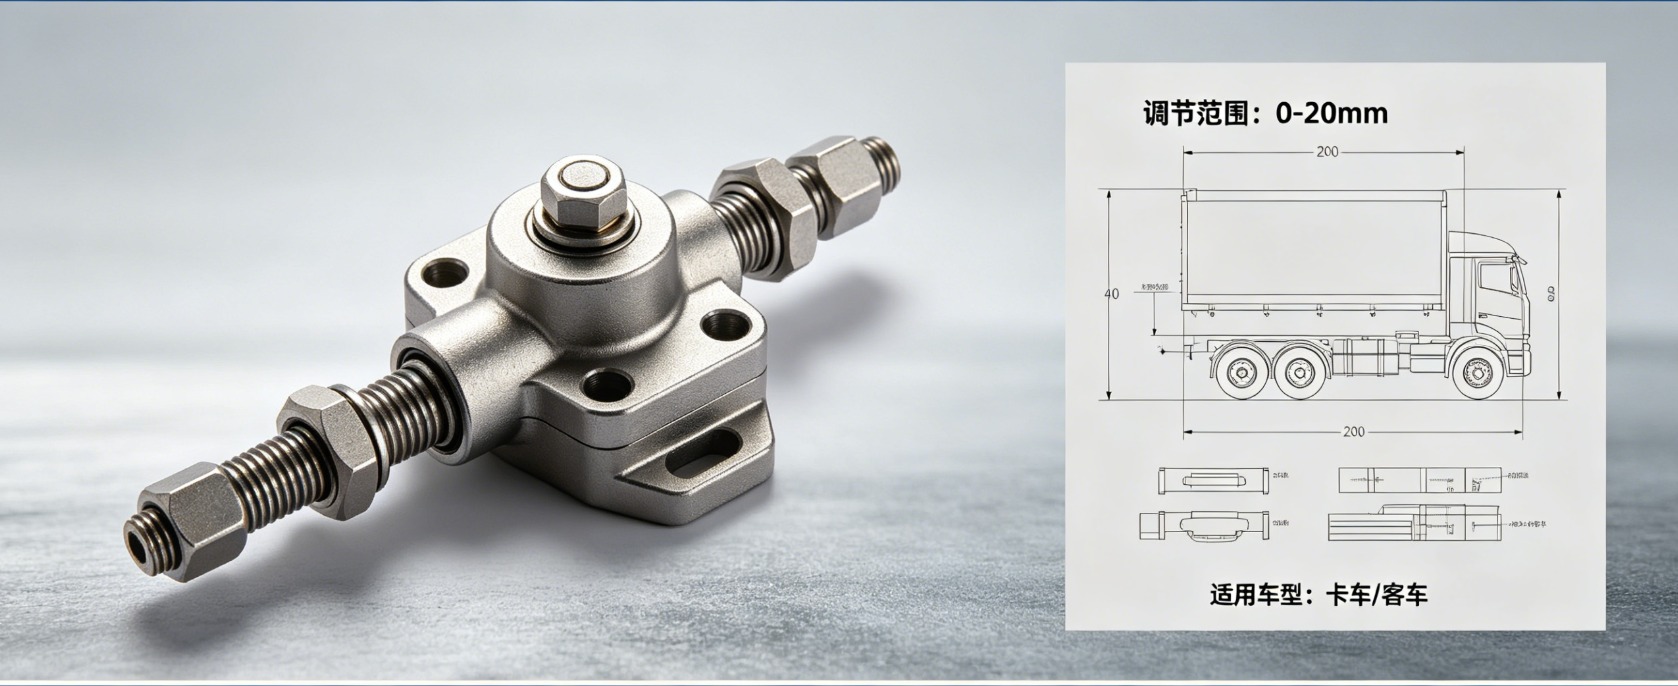
A manual slack adjuster acts as a mechanical link between the brake chamber pushrod and the camshaft in S-cam drum brake systems. Its primary function is to compensate for brake lining wear by adjusting the distance the brake shoes must travel to contact the drum. Unlike automatic versions, manual adjusters require physical intervention to take up the “slack” created as friction materials diminish over time.
For B2B buyers and maintenance managers sourcing from a China auto parts manufacturer, understanding the mechanical integrity of these components is vital. High-quality slack adjusters must withstand high torque and environmental corrosion to prevent brake fade. Maintaining these components ensures that the air brake system remains balanced across all wheel ends, preventing Jackknifing or uneven tire wear.
Pre-Inspection Safety Protocol
Before performing any adjustments, the vehicle must be parked on a level surface with the engine off. Safety is paramount when working under heavy machinery; therefore, the wheels must be securely choked to prevent accidental rolling. The air system pressure should be maintained between 90 and 100 psi to ensure the parking brakes can be released during the adjustment process.
Releasing the spring brakes is a mandatory step for manual adjustment. If the parking brakes are engaged, the internal springs exert force on the slack adjuster, making it impossible to rotate the adjustment bolt. Professionals should always use jack stands if any part of the body is positioned under the chassis, adhering to OSHA vehicle maintenance safety standards.
Tools Required for Manual Brake Adjustment
The efficiency of a brake service depends on using the correct specialized tools. Using improper wrenches can strip the adjustment bolt, leading to costly replacements of the entire brake assembly.
| Tool Name | Specification/Purpose | Necessity |
|---|---|---|
| Wrench | 9/16″ or 1/2″ (Standard for most adjusters) | Essential |
| Pry Bar | 12-inch to 15-inch length | Essential |
| Ruler/Brake Ruler | Increments of 1/8 inch | Essential |
| Chalk/Marker | High-visibility for marking pushrods | Recommended |
| Lubricant | Heavy-duty chassis grease | Essential |
Step-by-Step Manual Slack Adjuster Adjustment Process
The goal of the adjustment is to minimize the pushrod stroke while ensuring the brake shoes do not drag against the drum when the pedal is released.
Step 1: Inspect the Hardware
Check the slack adjuster for cracks, worn splines, or damaged clevis pins. If the internal gear mechanism feels “mushy” or fails to hold torque, the unit must be replaced. A faulty adjuster can lead to total brake failure under heavy loads.
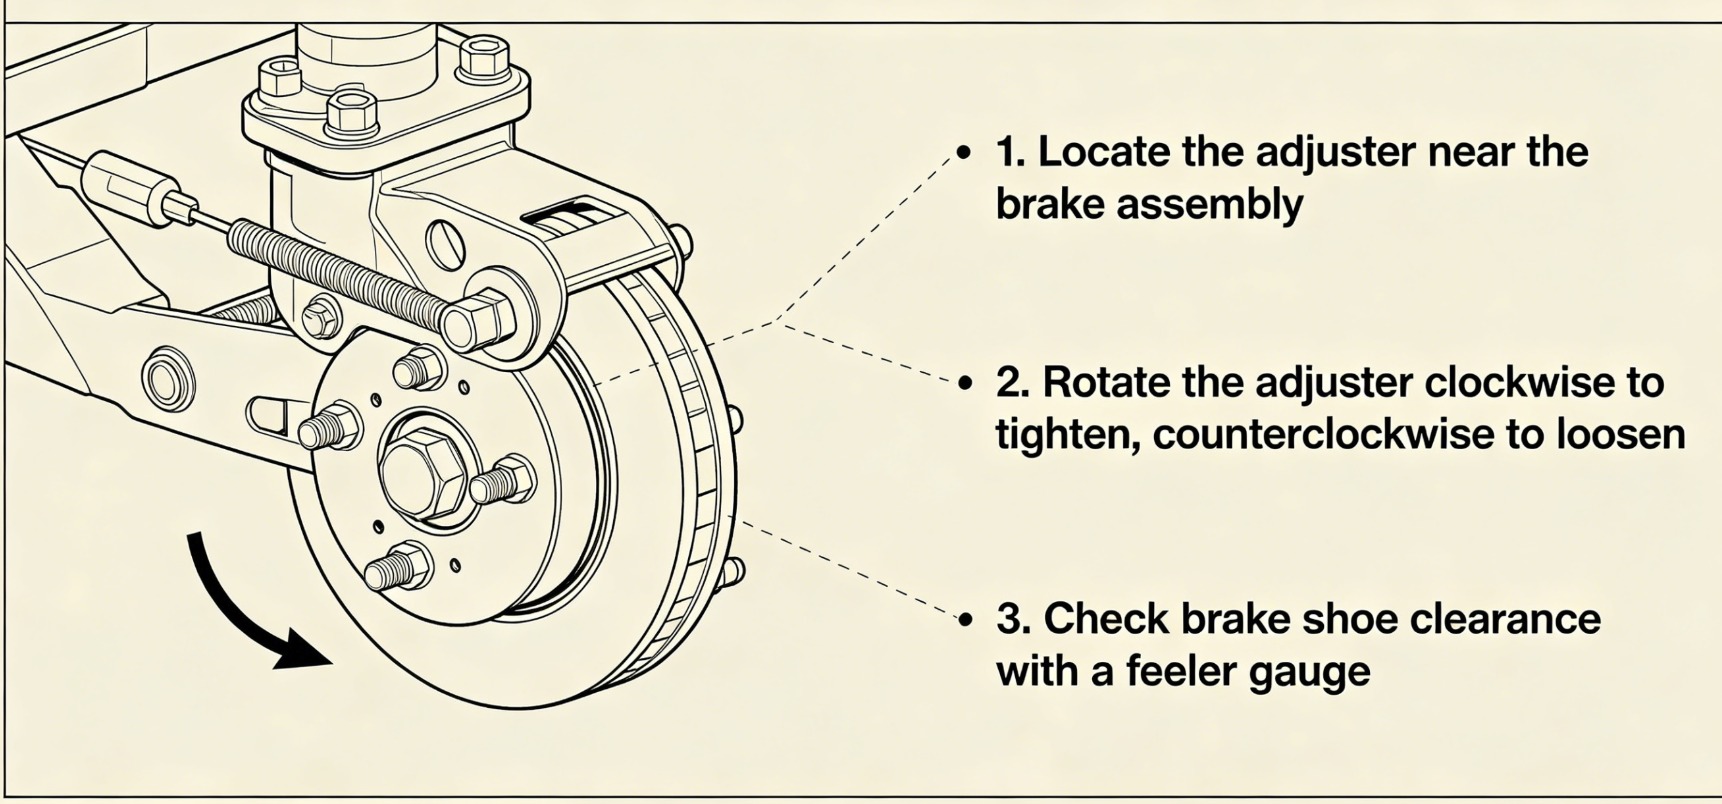
Step 2: Back off the Locking Sleeve
Many manual slack adjusters feature a spring-loaded locking sleeve or a bolt-on lock. Use your wrench to depress the sleeve before attempting to turn the adjustment nut. Failing to do this will damage the internal locking teeth.
Step 3: Tighten Until Seated
Turn the adjustment bolt clockwise until the brake shoes make firm contact with the brake drum. You will feel significant resistance once the linings are seated. At this point, the pushrod should have zero play.
Step 4: Back Off for Clearance
To provide the necessary operating clearance, turn the adjustment bolt counter-clockwise (backwards) by 1/4 to 1/2 of a turn. This “backing off” creates the small gap required to prevent brake dragging and overheating.
Step 5: Verify the Stroke
Measure the applied stroke by having an assistant apply 80-90 psi of air pressure to the service brakes. According to the Commercial Vehicle Safety Alliance (CVSA) North American Standard Out-of-Service Criteria, the stroke for a standard Type 30 brake chamber should generally not exceed 2 inches.
Comparative Analysis: Manual vs. Automatic Slack Adjusters
While many modern fleets utilize automatic slack adjusters (ASAs), manual versions remain prevalent in specific international markets and older trailer models. Understanding the trade-offs is essential for procurement departments dealing with a commercial vehicle parts supplier.
| Feature | Manual Slack Adjuster | Automatic Slack Adjuster (ASA) |
|---|---|---|
| Maintenance Frequency | Requires frequent manual checks | Self-adjusting during operation |
| Reliability | Highly reliable; fewer moving parts | Complex; prone to seizing if not greased |
| Cost | Lower initial purchase price | Higher initial investment |
| Best Use Case | Secondary trailers; cost-sensitive markets | Long-haul heavy-duty tractors |
| Safety Risk | High if neglected by the operator | Lower, but can give a false sense of security |
Common Mistakes to Avoid During Adjustment
One of the most frequent errors in heavy truck maintenance is over-tightening the adjuster. If the shoes are too close to the drum, friction will generate excessive heat even when the brakes are not applied. This leads to “glazed” linings, which significantly reduces the coefficient of friction and increases stopping distances.
Another critical error is failing to lubricate the brake camshaft and the adjuster itself. Friction within the splines or the cam bushings can cause “false” torque readings during adjustment. Professionals should always pump grease into the zerk fitting until clean lubricant exits the relief hole, ensuring the internal gears rotate freely.
Identifying When to Replace a Manual Slack Adjuster
Components in the braking system eventually succumb to mechanical fatigue. A manual slack adjuster should be decommissioned if it requires adjustment more than once a week under normal operating conditions. This typically indicates that the internal ratchet or gear teeth are rounded and can no longer hold the tension of the brake applications.
When sourcing replacements from a China brake system factory, ensure the splines count (typically 10, 28, or 37) and the arm length match the original equipment manufacturer (OEM) specifications. Installing an adjuster with the wrong arm length will change the mechanical leverage, resulting in unbalanced braking across the axle.
The Impact of Proper Adjustment on Fleet Operational Costs
Precise brake adjustment directly influences the Total Cost of Ownership (TCO) for commercial vehicles. Properly adjusted brakes ensure even wear across all brake linings, extending the interval between reline services. Furthermore, it prevents heat-related damage to wheel seals and bearings.
According to data from the Federal Motor Carrier Safety Administration (FMCSA), brake-related violations are among the most common causes of vehicle out-of-service orders during roadside inspections. Maintaining manual adjusters within legal limits avoids costly fines and prevents delays in logistics schedules.
Maintenance Checklist for Heavy-Duty Brake Systems
To ensure long-term reliability, follow this standardized checklist during every 10,000-mile inspection interval:
- Visual Inspection: Look for missing cotter pins or loose clevis bolts.
- Lubrication: Apply NLGI Grade 2 grease to all grease points.
- Stroke Measurement: Ensure all chambers on the same axle have symmetrical stroke lengths.
- Hardware Integrity: Check that the brake chamber mounting bracket is not bent or cracked.
- Drum Condition: Inspect for heat checks or heavy scoring on the drum surface.
Conclusion
Mastering the adjustment of manual slack adjusters is an indispensable skill for maintaining the safety and compliance of heavy-duty trucks. By following standardized procedures—tightening until seated and backing off by a half-turn—operators can ensure reliable stopping power and extended component life. For fleets looking to optimize their supply chain, partnering with a reputable truck parts manufacturer ensures access to high-precision components that meet international safety standards.
Frequently Asked Questions (FAQ)
1. How often should manual slack adjusters be checked on a heavy truck?
Standard industry practice suggests inspecting manual slack adjusters every 10,000 miles or during monthly safety checks. However, for vehicles operating in mountainous terrain or heavy stop-and-go traffic, weekly inspections are recommended to account for accelerated lining wear and ensure the pushrod stroke remains within legal safety limits.
2. Can I replace a manual slack adjuster with an automatic one?
Yes, it is possible to retrofit automatic slack adjusters onto systems originally equipped with manual ones, provided the camshaft splines and chamber brackets are compatible. However, you must replace both adjusters on the same axle to maintain balanced braking force and prevent the vehicle from pulling to one side during stops.
3. What does it mean if my manual adjuster won’t turn?
If the adjustment bolt is seized, it is likely due to internal corrosion or a failure to release the locking sleeve. Do not apply excessive force with an impact wrench, as this can shear the internal gears. Try applying penetrating oil and ensuring the spring brakes are fully released before attempting further movement.
4. Why is my brake stroke still too long after I adjusted the slack?
A persistent long stroke usually indicates worn-out brake linings, a distorted brake drum, or excessive play in the S-cam bushings. If the mechanical components are too worn, the slack adjuster cannot take up enough space to bring the stroke back into the legal range, necessitating a full brake overhaul.
5. Is it legal to manually adjust an automatic slack adjuster?
While you can manually adjust an ASA to get a vehicle to a repair shop, routinely doing so is a sign the ASA has failed. Safety regulations generally prohibit “adjusting” a failing ASA as a permanent fix. If an ASA is out of adjustment, it must be inspected for mechanical defects and replaced if necessary.
Post time: May-11-2026